That’s exciting, particularly for folks with small gardens. Even with limited space, time, and energy, there’s still a method for producing spectacular tasting spuds!
All About Growing Lazy Bed Potatoes
Traditional Method For Planting & Growing Potatoes
The traditional method of growing potatoes involves digging trenches about three feet apart, placing seed potatoes a foot apart in the trenches, covering the seed potatoes, mounding soil around the seed potatoes as they grow, weeding regularly, and finally digging the potatoes at harvest time. Obviously, this method requires lots of space, preparation, time, and effort to produce potatoes.
Original Lazy Bed Method For Planting & Growing Potatoes
The Incas and Irish both used the original “lazy bed method” to grow potatoes on marginal or unprepared ground. In this method, a bed about 4 feet wide (and whatever length desired) was laid out and the sod from alongside the bed was dug up and folded onto the bed (thus smothering whatever was growing in the bed already).
Two rows of seed potatoes were placed on top of the sod spaced about every foot, and then more soil was mounded on top of the potatoes as they grew. This soil was taken from the trenches where the sod had originally been removed. This method requires a little less space, but it is still quite labor-intensive in terms of digging, mounding, and weeding in order to get a good crop.
Modified Lazy Bed Method For Planting & Growing Potatoes
The modified “lazy bed method” is easier, and produces a good crop of potatoes in a smaller space. In this method, a bed is lightly cultivated, seed potatoes are placed a couple of inches deep in the soil at a 12-inch spacing in the bed and then are covered with a thick layer of mulch.
The potato plants grow up through the mulch while the tubers form in the soil just below the mulch. This method eliminates the mounding and weeding after sowing, allows for closer spacing, and makes harvesting a snap – just pull back the mulch and pick out the potatoes.
Planting under mulch doesn’t reduce yields and has the added benefit of conserving moisture, producing cleaner potatoes, and adding organic material back into the soil.
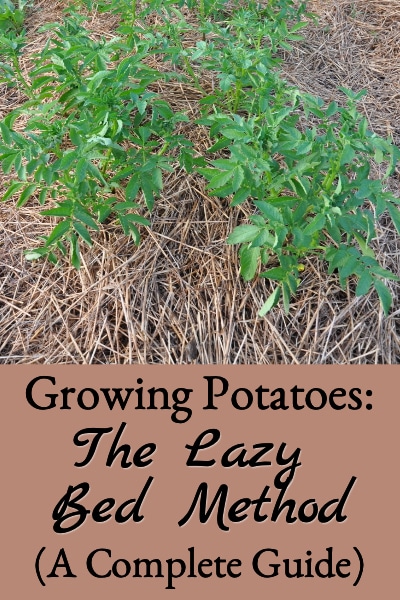
Lazy Bed Potatoes Growing Through Mulch
Potato Basics
Potatoes are from the Solanaceae (nightshade) plant family, which also includes tomatoes, peppers, eggplant, petunias, and tobacco. The enlarged, edible portion of the potato plant is called a “tuber,” and it develops underground on stems called stolons.
Potato growers use a tuber piece containing at least one dormant bud (eye) that will sprout to grow each potato plant. These tuber pieces are called “potato seed” or “seed pieces.” The above-ground potato plant grows from the bud on the seed piece, and new tubers form below-ground on the stolons when the plants are six to eight inches tall. Many potato varieties develop flowers on the above-ground potato plants, but these parts are not edible.
For good results, only certified seed potatoes should be purchased each year for planting. Certified potato tubers are seed of a known variety grown under strict conditions to produce seed tubers that are virus and disease-free. This ensures disease-free plants and good yields.
Potatoes from the grocery store should not be used for planting. Grocery store potatoes have generally been treated to prevent sprouting and will not produce well.
Preparing the Potato Garden Bed (Lazy Bed)
To use the lazy-bed method, prepare a rectangular garden bed that’s at a convenient width to reach across (mine are four feet wide) and as long an area as you wish to plant. You want it to be convenient width to reach across so you can easily harvest “new” potatoes by reaching beneath the mulch.
Cultivate the bed to loosen the soil at least several inches deep and work in a generous amount of well-composted manure or compost. If heavy rains are a problem in your area, raise the prepared bed slightly to encourage better drainage and prevent rotting of the potatoes.
Potatoes should not be planted in the same spot where potatoes or other nightshades have grown in the last three years. By rotating where potatoes are planted annually, the risk of disease and pests can be dramatically lowered.
Potatoes can be grown on marginal soils, but appreciate fertile soil and will produce better yields. The best pH for potatoes is between 5.5 and 6.0. A pH above 6.0 may increase the incidence of scab (a disease) on tubers, so it’s best not to amend the soil with lime or fresh manure in the year that the potatoes are to be grown.
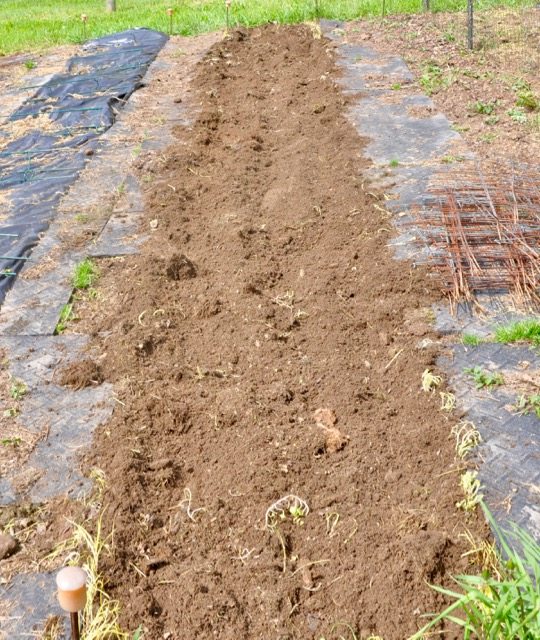
Lightly Cultivate the Lazy Bed for Potatoes
Choosing Potato Varieties for Growing
Contrary to the potato monotony found at the supermarket, potatoes are available in many varieties, with skin and flesh colors of blue, pink, purple, red, tan, white, or yellow (although the skin and flesh colors don’t always match). There are high specific gravity (best for baking and frying) and low specific gravity varieties (best for boiling or steaming), as well as early, mid, and late-season potatoes.

Colorful Potato Varieties
To choose potato varieties to grow, consider what you want to use the potatoes for and what does well in your region. Check out local farmer’s markets to find and taste varieties that are being grown and sold in the area. It’s also useful to get catalogs from companies selling seed potatoes; the catalogs generally have a wealth of information on each potato variety.
It is critical to choose varieties that will have time to mature within the length of your growing season (potatoes are susceptible to frost damage). Growing multiple varieties in the lazy bed is fine, there’s no need to limit the varieties being grown to one.
For the 12-inch lazy bed spacing, it’s better to choose varieties that set a few large tubers, rather than many smaller tubers. For first-time growers, shorter season varieties are a good choice because they get the job done quickly and you can usually get them in and out before insects, disease, or weather cause problems.
Caribe is a short-season variety that we enjoy growing. It matures in 70 – 75 days, tastes good, is one of the prettiest potatoes, and has high yields. Another shorter season variety that many love is the Yukon Gold potato.
Preparing The Seeds
Pre-sprouting the seed potatoes is an optional step that can be used to shorten the time required for the potatoes to reach maturity in the garden (by about two weeks). To pre-sprout the seed potatoes, begin about four weeks before your expected planting date and warm the seed tubers to 65° – 75°F in the dark for about a week. When sprouts appear, expose the tubers to light and lower the temperature to about 50°F. The light will turn the sprouts green and keep them short and sturdy for planting.
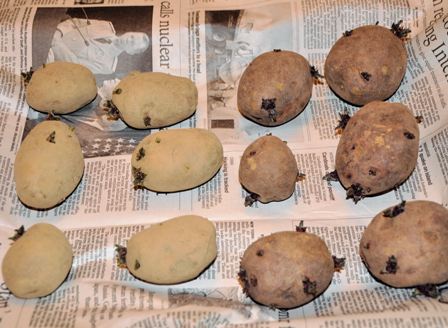
Presprouted Seed Potatoes
Small seed potatoes can be planted whole, but larger potatoes should be cut into smaller pieces before planting. The ideal seed potato weighs 1 -2 ounces with two or more eyes. Larger seed potatoes can be cut into several pieces but should always contain at least two eyes per piece. After cutting, the seed pieces should be warmed to room temperature for 48 – 72 hours prior to planting, allowing the cut surfaces to heal and reduce the chance of rotting.
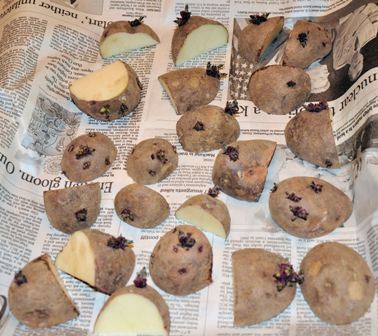
Seed Potatoes After Cutting
Planting the Potatoes
Avoid plating potatoes too early in cold, wet soil. Let the soil warm up to at least 50°F, and plant the warmed-up seed pieces after the risk of any hard frost has passed.
Place your prepared seed potatoes, cut side down, 12 inches from the bed side/ends, and 12 inches from each other in the bed. So, for example, in a 4-by-8 foot bed, you could place 3 seed potatoes across and 7 down the bed for a total of 21 plants. After the seed potatoes are in place, bury them 2 inches deep in the prepared bed, and wait until the potato sprouts emerge through the soil.

Seed Potato Lazy Bed Spacing
After the seed potatoes have sprouted through the soil, carefully cover them with a thick layer of mulch (straw or hay is typical). The mulch layer should be loose enough to allow the potato plants to grow through but should be 12 – 18 inches deep. The loose mulch will back down gradually, and you want to make sure it’s thick enough so the forming potatoes will never show through the mulch layer.
If the potato tubers do come in contact with sunlight, they will become green, form glycoalkaloids, and should not be eaten. It can be difficult to add more mulch once the plants have come up through the mulch, so it’s a good idea to make sure the layer is thick enough from the start.
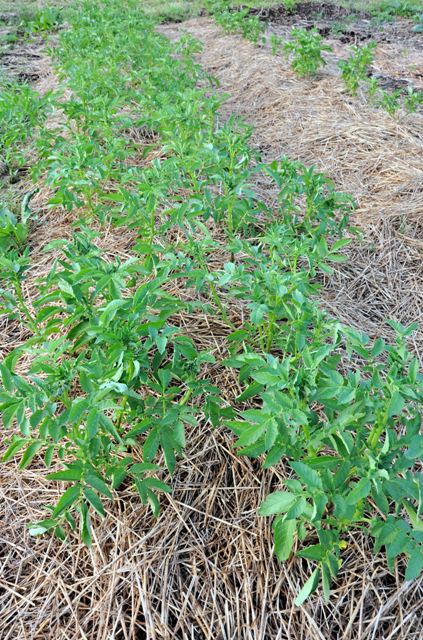
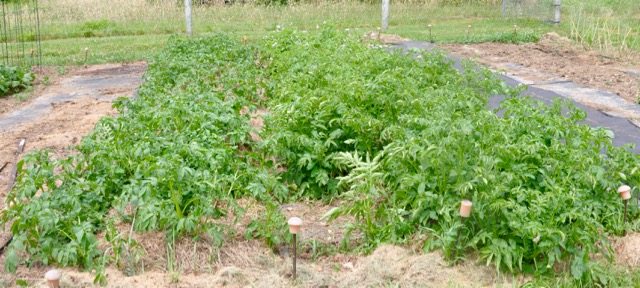
Lazy Bed Potatoes
Care and Harvesting of Lazy Bed Potatoes
After planting, as the tubers mature (tubers usually begin forming when the potato plants blossom above ground), you can reach in and sneak new potatoes any time, but there’s very little work needed until harvest time.
You should be on the lookout for pests such as potato beetles (see Controlling Potato Beetles) and make sure that the tubers get an adequate amount of water, especially in their early days. They need 1 to 1-½ inches of water per week from rainfall or irrigation. But, it’s best to keep the potato foliage as dry as possible to prevent disease.

Adult Potato Beetle
When it’s time to harvest lazy bed potatoes, it couldn’t be easier. Wait until the potato vines have shriveled (that means the potatoes aren’t getting any bigger below the mulch), and then just pull the mulch back and pick out the potatoes. It’s important to dig down into the soil a bit to make sure you’ve gotten all of them. Also check the mulch for any hidden potatoes.
For each pound of potato planted, with good weather, enough water, few insects, and no disease, you can expect to yield around 10 pounds of potatoes.
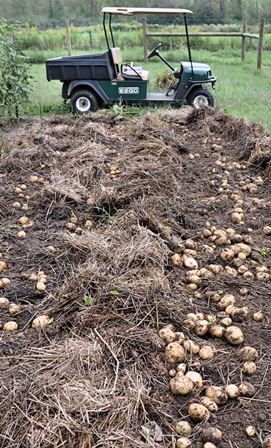
Harvesting Lazy Bed Potatoes
Storing Potatoes
After harvesting, let the potatoes dry for a few days (in the dark) to allow their skins to toughen. Then, move them into storage. If you will be using the potatoes within a month then they can be stored at room temperature.
For long-term storage, the temperature should be approximately 40°F and the relative humidity should be between 85 – 90%. They should be kept in total darkness, and there should be good ventilation. Light exposure will make them green and inedible, higher temperatures will cause them to sprout, and inadequate humidity will cause them to shrivel. However, if kept in good conditions, they can last up to six months in storage.
Isn’t it great to know that there’s an easy method for producing great potatoes even if space, time, and energy are limited?

Homegrown Lazy Bed Potatoes

Leave a Reply