But they’re a lot of work too, and it’s not a job to take lightly. They require frequent monitoring and care for the first five to six weeks. Someone needs to be available every day. There are no vacations or days off during those critical first few weeks.
How To Raise Day-Old Chicks
1) When & Where to Raise Chicks
There are several points to consider here; baby chicks need a constantly warm and draft-free environment, it needs to be predator-proof, they’ll smell, and they create amazing amounts of dust; so a garage, barn, workshop, or location outside your home is usually the best choice.
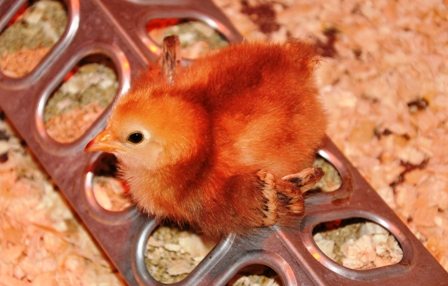
Day-Old Chick on Baby Chick Feeder
The first time we raised day-old chicks, we thought taking care of the predator-proof, smelly, dusty part was easy – we put them in a barn stall. However, keeping chicks at a constant temperature in a barn stall (using an infrared heat lamp) while the temperatures ranged from 54° – 98° outside (we raised our first day-old chicks starting in early fall which is NOT the best time to do it) proved to be quite challenging. So, keep in mind the likely outdoor temperatures for the first weeks, and choose accordingly.
Each time we’ve raised chicks subsequently, we’ve gotten a little smarter. We now get day-old chicks in the spring as temperatures are warming up, that way as they’re getting older, temperatures are going up, and you don’t have to play with the heat lamp as much.
Keeping them indoors is an option too, just don’t underestimate the dust and smell they’ll create. If possible, pick an unused room and cover surfaces with old sheets to mitigate the dust problem. It will certainly be easier to maintain a constant temperature and stop predators with them indoors.
2. What to Raise Day-Old Chicks In (i.e. the Brooder)
Generally, a container that provides good ventilation is used for the brooder. Initially, it doesn’t need to be very large (less than 1 sq. ft. per chick), but because they grow so quickly, the brooder will eventually need to provide about 2 sq. ft. per chick.
Wall height is also a consideration. Baby chicks fly well by two or three weeks, so the walls should be pretty high (or screening can be placed over the brooder to keep them in). Finally, it shouldn’t be anything fancy (it’s going to get dusty, dirty, and smelly) so cardboard boxes or plastic containers are frequently used.
The first brooder we used was made from a TV armoire we found sitting beside the road, waiting to be hauled off as trash. We took the shelves and drawers out and put the back on the ground.
Initially, it was 3’ wide x 5’ long x 2’ high for 30 chicks, but we had to extend the length to 8’ by week 3. Also, the chicks could fly over the top by week 3, so we used screening to keep them in. By week 5, we released them into the entire 10’ x 10’ barn stall so they’d have sufficient room.
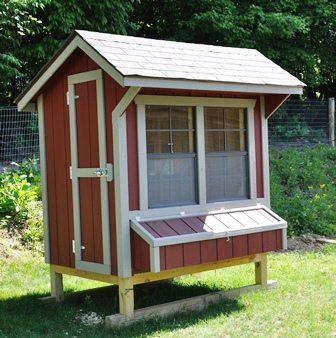
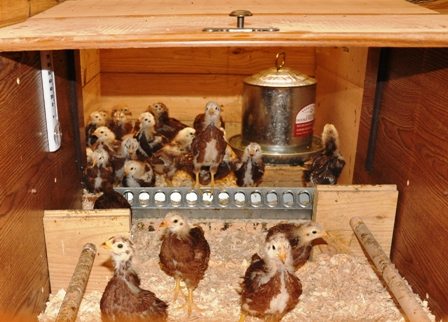
Chick Brooder Coop
When it became apparent that day-old chicks each spring were likely to be a regular occurrence on the farm, we eventually just dedicated a small coop to being a brooder (see photo above).
3. Bedding for the Baby Chick Brooder
Day-Old Baby Chicks on Paper Towel in the Brooder
Because chicks grow so quickly, they also create a lot of waste; and a very absorbent bedding material is needed. Pine shavings spread about 1” thick seem to be a popular choice – that’s what we use, and it’s worked well.
We found that the bedding needed to be changed at least once a week; smell and appearance make it pretty easy to decide when shavings should be changed.
The day chicks arrive however, they often want to eat the pine shavings instead of food. So, we use paper towels until the chicks learn what food is. Within a day or two they’ve figured out the difference, so the paper towel can be replaced with the pine shavings. Paper towel isn’t a good long-term solution (not absorbent enough), but it works for the first several days.
Cedar shavings, sand, and newspaper are all bedding materials to be avoided; cedar because the fumes can damage their delicate respiratory systems, sand because it gets very hot under the light and they tend to eat it, and newspaper because it’s too slippery and not sufficiently absorbent.
4. Keeping Day Old Chicks Warm
The day-old chicks need to be kept at a constant 95° their first week, 90° the second week, and so on (reducing 5° per week) until they’re five to six weeks old or reach the ambient outdoor temperatures. A 250-watt, red infrared heat lamp suspended over the middle of the brooder is the recommended source for this heat. Red light helps prevent pecking issues and is less stressful for chickens than white light.
We place two thermometers in the brooder (one on the floor under the lamp and another further away) so we can watch the temperature, and adjust the heat lamp up or down accordingly. When the chicks are cold, they huddle together in a pile under the lamp; while when hot, they spread out and avoid the lamp. By monitoring the thermometer you can make sure they have the proper temperature, and they can determine whether to huddle or spread out as they find necessary.
As the chicks get older, it’s obvious that some develop faster and can tolerate colder temperatures better. By watching the thermometer, you can maintain the recommended temperature in the middle of the brooder for the slower birds, and the bigger birds can find their comfort zone by moving away from the lamp.
5. Watering Baby Chicks
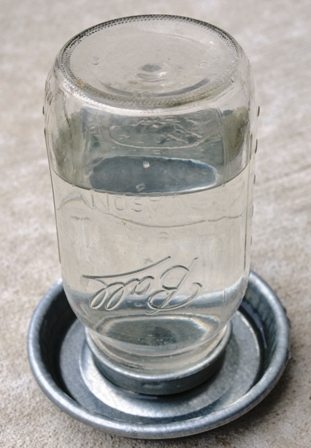
Day-Old Chick Waterer
The first thing that chicks need when they arrive is water, so it’s important to have appropriate waterers and to keep them filled and clean.
Baby chicks can drown or hurt themselves if inappropriate waterers are used, so it makes sense to buy the proper equipment. There’s an inexpensive waterer available that screws onto a mason jar and is sized specifically for baby chicks (see photo above). I like the metal type (there’s enough cheap-looking plastic around already), and we use two for 25 – 30 chicks.
The chicks inevitably get waste and pine shavings in the water, so they need to be washed and refilled several times daily. As the chicks get bigger, the waterer stays cleaner if it’s off the ground (making sure it isn’t too high for them to reach) by placing them on boards. Eventually, we change to one two-gallon “font” type waterer that gets washed and refilled twice daily.
6. Feeding Day-Old Chicks
There are also feeders for baby chicks – available in plastic or metal. We went with the metal and chose the long multi-opening type so many chicks could feed simultaneously. Again, disasters can happen if the right equipment isn’t used, so it’s best to buy what’s appropriate.
For feed, there’s either medicated or un-medicated “starter” feed that’s been formulated specifically to give growing chicks everything they need. If the chicks have been vaccinated for coccidiosis, then the un-medicated feed can be used while the medicated feed is good for chicks that haven’t been vaccinated.
We generally don’t get vaccinated chicks, so we’ve often used a medicated starter feed. If we’re raising baby Buckeyes, they benefit from higher protein levels than those offered in “chick” starters. So, we use a higher protein-medicated turkey starter. It’s really dependent on the type of bird being raised.
Since chicks are growing babies, they should get as much chick starter food as they want and they shouldn’t get too many “treats” (bugs, worms, grapes, etc.).
7. Roosts for Baby Chicks
Roosts aren’t absolutely necessary, but providing them does help keep the waterer and feeder clean. If roosts are provided, they’ll hang out there rather than on the waterer and feeder (sometimes). A simple roost of whatever length needed can be made by taking two 4” square x 1” thick boards, drilling a 1″ round hole in each, and inserting a 1″ round dowel between the boards. Even easier, find an appropriately shaped branch and place it in the brooder.
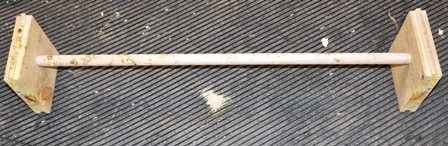
Easy Homemade Chick Roost
8. Putting It All Together for Raising Chicks
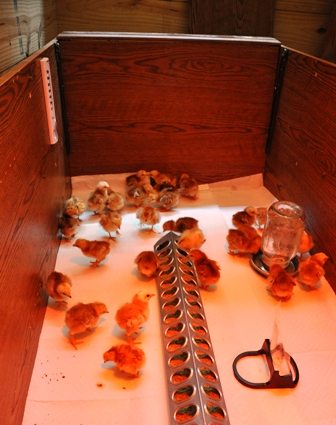
Baby Buckeyes in Brooder
The day before receiving baby day-old chicks is the time to set everything up. With all the equipment in the brooder, get the temperature stabilized at 95°.
When they arrive, immediately move the chicks into the brooder. Then make sure they’re finding the water (they need water as soon as possible). If no one’s drinking, pick an energetic chick and carefully dip its beak into the water. The rest should learn after seeing the first drink from the waterer.
Follow the same procedure to make sure they’re eating.
9. Pasting Up
Once everyone appears to be eating and drinking, they should all be checked for “pasting up”. This is a condition where their droppings cake over the vent area, preventing them from passing more droppings. This condition is fatal if not remedied, so it’s very important to continue checking the chicks the first week, and fixing any pasting up that’s observed.
Pasting up can be fixed by taking a paper towel, dunking it in warm water, and gently using it to remove the blockage. Remember gently, or the fuzzy down will come off too (and the other birds may then pick on this area). If the blockage isn’t coming off, you can dunk the chick’s back end in warm water until things loosen up.
10. Baby Chick Losses
In each batch of day-old chicks, no matter how good the care, it’s likely that a few won’t make it. In our case, we usually lose one or two for no apparent reason.
It’s critical that they’re kept at the right temperature, have clean water, get unlimited food, and are protected from predators; but if they’re given good care and there are still losses, it’s important to realize some chicks are simply not hardy at birth. The trip through the postal system is also rough on them, so it’s better to pick up day-old chicks if at all possible (here’s a link to some sources for chicks – free hatchery catalog/links for chicks).
11. As Your Baby Chicks Grow
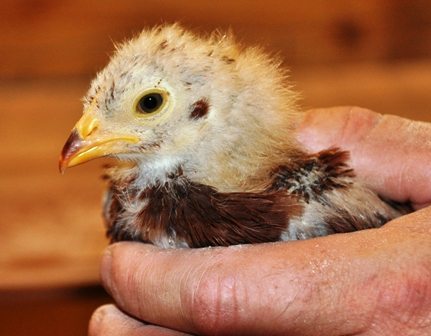
Baby Buckeye Chick
As they get older, we like to make sure we’re socializing all the chicks and give them treats (they like grapes) as we handle them. That way, when they reach maturity, they’re familiar with being handled and run toward us, rather than the other way. It makes taking care of them much easier, and I think friendly, sociable birds are more enjoyable.
The reward for all the early work is healthy, friendly, sociable chickens in your backyard that will provide high-quality eggs after about five months. And, months of entertainment as you watch them grow!
Carol L says
Hello. I’m going to be raising chicks for the first time this spring. I’m waiting for the weather to warm up a bit first, and reading all I can.
I like to know where bloggers are from so I can gain information about what I read and how to compare it to my location. Here in Oregon, and elsewhere in the US, it isn’t called pasting up, it’s called pasty butt. (anyway, that is all I have ever heard it called in blog posts I’ve been reading for decades)
This has some great information that I’ll be using, including that in the comments! Thank you!!!
Laura says
This is a wonderful article! I have 32 eggs in my incubator and anticipate hatch in a few days! May I ask how you suspend your heat lamp above more temporary borders (I have a big cardboard box)? Also wondering if you have hatched your own eggs before, and how long you wait to move hatchlings from the incubator into the brooder? Thank you!
Shannon says
I love reading and learning from your website! If I may add a little tip that has kept all my day old chicks alive each and every time: give them pedialite when they 1st come home. It will rehydrate them and provide valuable electrolytes that they need.
Lesa says
Thank you for the tip Shannon!
Marsha says
I have a day old that is having trouble walking and balancing what can I do
Lesa says
Hi Marsha,
About all you can do is make sure that it’s at the right temperature and is eating and drinking. Sometimes they get better as time goes on, but as I mentioned above, some don’t thrive.
Elke says
We had one chick that hatched and could not walk and stand. We looked it up online and made a little splint with a tiny elastic and piece of (drinking) straw. It worked! 24 hours later she was walking on her own! Now she is a gorgeous hen laying eggs for us!
Lesa says
Elke, that’s wonderful hat you were able to help her! Thanks for sharing with us 🙂
Austine caleb says
I love this
Anne says
hi, thank you for all the helpful tips! Do you recommend raising day olds yourself, over putting them under a broody hen? Have you ever done that?
Thank you!
Medley says
Thanks for the info. I am gathering information for the chicks I will get this spring.
Jane Michael says
Beautifully written information rich post ..thankuu …just today 9 out of 20 eggs hatched today and I got good info here about a day old chicks and howe to care and feed. Thank you.
Rachel says
I have just learnt alot from u, thank you so much. With yo basics ii think am now good to go.. Rachel from Uganda.
Lesa says
Hi Rachel, glad it was of help. Enjoy the chicks!